Monday, October 8, 2012

Chocolate Raspberry Torte

Ingredients
8 oz bittersweet chocolate
1 1/2 sticks butter
1 tsp vanilla extract, or seeds from 1 vanilla bean
7 oz sliced or slivered almonds
1/4 flour
Pinch salt
5 eggs
3/4 cup white sugar
1/2 cup raspberries, plus more for decoration
1/4 raspberry jam

For the Ganache
5 oz bittersweet chocolate
1/2 heavy cream

Start by grinding 1 cup of the almonds in a food processor, or you can place them in a ziplock bag and beat them with a rolling pin until they are very finely ground.  The finer the better, really.  The remaining almonds should be kept whole and will be used to garnish the sides of the cake.  Next, melt the butter and chocolate gently and then  set aside to cool.  Then, beat the eggs vigorously; you should be able to notice that they will become lighter in color and will increase some in volume.  While continuing to whisk, slowly add the sugar to the eggs.  Then fold the eggs into the chocolate/butter mixture.  Finally, gently stir in the almonds, flour, and salt.  Then pour the batter into two 8 or 9 inch greased cake pans.  Place in a preheated 325 degree oven for 14 to 16 minutes.  Let these cakes cool for at least half an hour until you attempt to release them from their pans.  


Meanwhile, mash the raspberries until smooth and then mix with the jam/preserves.  Once the cakes are cooled and out of the pans, spread the raspberry preserves between the two layers.  
Place the second layer on top.  
These were the raspberries that we set aside to decorate the cake.  
This is after the bruised ones were mashed up.  
For the ganache, simply melt the chocolate with the cream and whisk until very smooth and glossy.  Then, drizzle the ganache over the cake, making sure to cover the sides.  Next, cover the sides with the almonds, reusing the pieces that fall off to cover other areas.  Finally, take best raspberries and place them around the edge of the cake.  I think it looks nice to leave the center empty so you can see the pure chocolate.  
The cake can be made a day or two in advance if you wish.  Enjoy!

I should also thank Grace, Taylor and Meghan for their help.  

Monday, September 17, 2012

Stuffed Grape Leaves

I made these a long time ago but only just got around to posting them.  Whenever I make these I also like to make a bunch of other mezes because it keeps the meal interesting.  I think I also served baba ghanoush and spanakopita with this.  You can basically add anything you want to the filling.  I kept it simple by using just rice and ground beef, but you could certainly make this vegetarian (or even vegan, but you will lose a considerable amount of flavor if you use water instead of chicken stock to cook them).  

Ingredients
1 jar grape leaves
1/2 lb ground beef
2 1/2 cups rice (I used jasmine, but anything basic will work)
2 tbsp chopped parsley
salt and pepper
Several tbsp butter
1 quart chicken stock

I forgot to take pictures of me making the filling, but it's pretty self-explanatory.  Just brown the beef in a pan until cooked through, season with salt and pepper, then add the rice and parsley.  Note: the rice does not cook now, it will cook in the oven.  Also, this step can be done in advance.  Then, remove the grape leaves from the jar and let soak in a bowl of water for at least an hour (when you buy grape leaves they are soaking in a vinegar-y brine liquid and you want to dilute that as much as possible).  After that, just place a large tbsp of filling on top of a grape leaf, as shown above, and roll it up.  
You do this by first wrapping it from the bottom, then do both the sides, then complete the fold.  It should be done the same way you make a burrito so that the filling doesn't spill out the sides.  
Place them snug in a pan (you can have two layers if they don't fit), and pour chicken stock over the top until it comes about 3/4 of the way up the grape leaves.  
Dot the tops with a couple pats of butter, cover tightly with foil, and place in a 350 degree oven until the rice is tender.  For me, this takes about 1 hour.  
I also served these with a homemade tzatziki sauce.  I'll post the recipe for that soon.  I'm sorry that I didn't take any pictures of the finished dish.  I hope you give this a try.  Enjoy!

Tuesday, August 28, 2012

Grape Ice Cream with Bitter Orange Cake

I made several ice creams/sorbets this summer to deal with the heat.  I had originally intended to keep this just a sorbet without any dairy but I thought some added cream would help the texture.  The cake  that I paired this with was taken from Paul Bertolli's book, Cooking by Hand.  It's not so much a book of recipes but technique and it has a large section dedicated to homemade charcuterie.  

 I just picked the darkest grapes I could find.  I suppose you could use green grapes but I don't think it would pair well with the cake.  
 I had about a pound.  Just throw them all in a big pot.  
Meanwhile, zest some oranges with a vegetable peeler.   
 Throw a few strips in with the grapes as well as about 1/4 cup sugar (to start with) and a touch of orange juice and place on medium heat.  Cook until the grapes start to fall apart, about 10-15 minutes.  
I'll post the full recipe later for the cake but part of the wet ingredients include whole pureed orange.   
This was the final cake batter.  Again, I'll post the recipe in another post.   
Once the grapes have released their juice, press them through a fine strainer, pressing firmly to extract as much as possible.   
Then add about a cup or so of heavy cream and refrigerate until properly chilled.  This could be done overnight.  Then just place in your ice cream maker and churn until the desired texture.  
 The finished orange cake.  
Cut the cake in squares and slice each down the middle to make a little ice cream sandwich.  I wanted to be fancy so I made both a strawberry and mango coulis to drizzle over it.  


Monday, June 25, 2012

Mango Sorbet

Hello all.  Sorry this took so long.  I've been pretty busy with work and swim team but now that I've graduated hopefully I'll be able to focus on the blog more.  So, here's the mango sorbet that I mentioned earlier.  I bought an ice cream maker last summer but I haven't used it much so I think this summer I'll make a lot of fruit sorbets and ice creams.  

Ingredients
Mangoes (however many you want- 5 is probably a good number though)
1/4 cup sugar (you might need more or less depending on how many mangoes you use and how sweet they are)
1/4 cup water
2 tbsp Grand Marnier
2 tbsp lemon or lime juice

 You'll want to use ripe mangoes for this, otherwise the sorbet will taste rather dull.  
Nice and red 
 Chop up the mangoes anyway you'd like.  Then throw them in a blender or food processor.  
 The mangoes should be soft enough that they'll blend by themselves and not need any more liquid.  
Meanwhile, melt the sugar and water together in a saucepan for the simple syrup.   
 Once the mangoes are totally pureed, pass the fruit through a fine-mesh sieve because mangoes tend to be sort of fibrous, which would ruin the texture of the sorbet.  
 After you've strained the mixture, add in the lime juice and as much of the simple syrup as you need.  Make sure to taste as you go.  
 One secret to making ice creams and sorbets is to add some alcohol to the base which stops it from freezing into a solid block once it goes into the freezer.  
 This is the Grand Marnier and I added a couple tablespoons.  Then freeze in your ice cream maker according to it's instructions.  
 Once it is finished churning, put it in a tupperware container and place it in the freezer.  


 You can eat this by itself but I think it works better if you pair it with other components to make a composed dessert.  
Enjoy!

Monday, May 28, 2012

Coming up: Mango Sorbet

I know I've been a bit quit around here lately but I haven't forgotten about you.  I've only got about 3 more weeks of high school left but there are about a gazillion things to do in the meantime.  Anyway, I'll have this delicious mango sorbet up in the coming days.  

Tuesday, May 22, 2012

Tacos al Pastor

If you regularly check this blog, you'll know that I like to cook large amounts of pork shoulder, aka "Boston Butt."  Usually there are two different directions that I take.  One is a dry cooking method in the oven for a few hours to develop a substantial bark on the outside like southern barbecue.  The other method I sometimes use is to braise it in some sort of liquid, then shred it and serve in tacos for a Mexican influenced meal.  This recipe is more like the latter, yet it still gets some crust on the outside with the help of the grill.  Al Pastor is the style of taco where the meat is cooked on a rotisserie-like device and is shaved off as it cooks.  Also, pineapple is traditionally cooked along with the meat.  The technique actually goes back to the Middle Eastern dish, Shawarma.  For more info, click here.  

Ingredients
10 dried guajillo chiles
1 1/2 cups water
1 to 2 lbs tomatoes, seeds removed
8 to 10 cloves garlic
3 bay leaves
large pinch sugar
Tsp cumin
1/2 tsp ground cloves
5 to 8 lbs pork shoulder, cut into 1 1/2 inch thick slices (preferably boneless, but you can use bone-in)
1 lime
Pineapple slices, as desired (get fresh in the summer, but canned works if not in season)
Corn and flour tortillas
diced onion
Minced parsley and/or cilantro

 This is what a guajillo chile looks like.  You can usually find them in most supermarkets now.  Heck, even Kroger carries them.  

 Start by toasting them in a dry pan over high heat.  Cook until you think they are about to burn, then pull them out.  Once they are all toasted, remove the stems and seeds.  
  
 Cut the tomatoes in half and scrape out the seeds with a spoon or your hands.  

 Combine the water, chiles, tomatoes, garlic, bay, pinch salt and pepper, sugar, cumin, and cloves in a pot.  
 Bring to a boil, then reduce the heat to low and simmer until tomatoes break down, about half an hour.  
 Then puree with blender, food processor, or immersion blender.  
 Add pork to pureed chile mixture.  Cover and place in a 350 degree oven.  You want the pork to be tender, but not to fall apart completely, about 100 minutes.  
 While this cooked, I made some salsas and other accompaniments to go along with the meal.  Pictured here is simply a big bowl of chopped mango.  I was going to make more of a salsa out of it but it was so perfect I decided not to and just eat it plain.  
 This was a quick fresh corn salsa I made.  It has fresh corn off the cob, sugar, salt, pepper, and chopped parsley.  
 Just give it a mix.  
 More Mango!
 Once the pork is fork tender but still just holds together, remove it from the sauce.  

 I used canned pineapple slices.  Don't judge me.  Just sprinkle them with a little sugar so they caramelize well on the grill.  
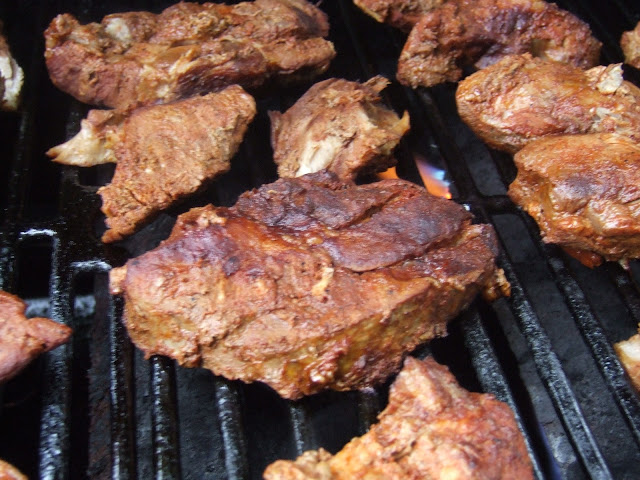
 Sear the cooked pork on the grill until it gets some nice color.  Remember, the pork is already cooked, you just want to give it some crust.  But you don't really have to worry about overcooking the meat because pork shoulder is pretty forgiving.  
  

 I gave it a quick chop and then threw it back in the chile sauce.  
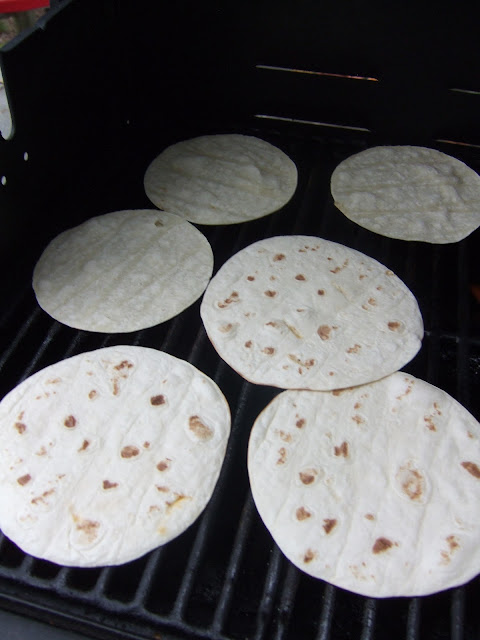
 Toast the pineapple and tortillas.  


 Nice grill marks!
 Then just spoon some pork, mango, corn, pico de gallo and sour cream into a tortilla.  An ice-cold Corona would go perfectly with this.  

Enjoy!